How To Embed Images and Videos In Blog Post Effectively?
Embedding images and videos in blog post is very easy. But sometimes you may get problem because of image width and height. Because if your image width and height is more than your available content place, image may not display properly. embedding videos is much more simple. You can embed videos from YouTube or upload from your hard drive.
Steps For Embedding Images In Post:
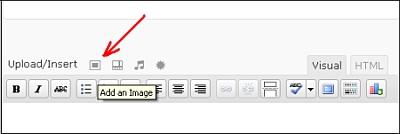
In the editor click the Add an Image button. See the below screen:

Once you click that once flash up loader will open in which you will get option to select image from your hard drive. If you have problem with flash up loader then you can try browser up loader. After selecting an image give a title for image and then click Insert Into Post.Now your image will appear in the post.
Sometimes there may some situation occur where you have to take a screen shot and want to embed that image in your post. Definitely the size of the image will be lager if you take the image by PrintScreen. So to make it fit with your blog you need a software to resize the image according to size of your content width.
You can download a free software IRFANVIEW to resize your image properly. It is very easy yo use. However you can use photoshop also. As I don’t have much knowledge in photoshop I am unable to give you tip for photoshop.
In IRFANVIEW just open your image and then go to
Image-> Resize/Resample from menu bar.
There you just set width and software will automatically adjust height. So, your image quality will be retained. Once more thing you can do for better quality of image. Go to Image-> Sharpen. It will make your image color more sharp.
You may also like to take screen shot of a full web page. In that case you can download a free FireFox AddOn. Download it here. After adding this Add-ons restart firefox. Now right click on the web page you want to save as an image and select either Save Image of Visible Portion or Save Image of Entire Page.
Steps For Embedding Videos In Post:
You may want to upload YouTube videos as well as videos from your hard drive. So I am showing you both the ways:
Embedding a YouTube Video: Get the video Embed URL. It will be in format of <object width..> Now click on HTML view of your editor and just place the URL wherever you want to display YouTube video. Remember not to go again visual mode as it can break the video. So, before embedding video to your post make other content ready to publish.
Embedding Videos From Hard drive: For this you need to install one plugin in your blog. (I will show you how to install plugin in my upcoming tutorial). You need to install All In One Video Plugin. Download it here. Install the plugin and activate it. After activated you will see a symbol in your editor. Video uploading is almost same as image uploading. It’s better if you convert your video to MP4 format because MP4 videos are compressed and it will take less time to upload. you can download free AVI to MP4 converter here.
I hope you are you enjoyed my article. If yes, then consider it for bookmarking or give me your valuable feedback below.
Note: You can access to all tutorials from here -> Blogs Tutorial
Related articles by Zemanta
- 7 Time Saving Firefox Add-ons (themoxiemomblog.com)
- Suck at taking Screenshots? Use This. (computer-realm.net)
Internet highlights
- Best Non Gamstop Casino
- Miglior Casino Non Aams
- Migliori Siti Casino Online
- Non Gamstop Casino
- UK Online Casinos Not On Gamstop
- Non Gamstop Casino
- Siti Casino Non Aams
- Casino Sites Not On Gamstop
- Meilleur Casino En Ligne
- Non Gamstop Casino UK
- UK Casino Not On Gamstop
- Non Gamstop Casino UK
- Non Gamstop Casino UK
- Casinos Not On Gamstop
- Non Gamstop Casinos
- Migliori Siti Casino Non Aams
- Best UK Casino Sites
- Non Gamstop Casino UK
- UK Casinos Not On Gamstop
- Non Gamstop Casinos
- Best Betting Sites In UK 2025
- Casinos Not On Gamstop
- Casino Italiani Non Aams
- Crypto Casino
- Casino Français Crypto
- Sites De Paris Sportifs Belgique
- Sites De Paris Sportifs Belgique
- Casino Online
- Casino En Ligne Avec Retrait Immédiat
- Site De Paris Sportif Tennis
- オンカジ 出金早い
- Meilleur Casino En Ligne
![How To Embed Images and Videos In Blog Post Effectively? Reblog this post [with Zemanta]](../../reblog_e.png)


