The 3 Easiest Steps To Create a Blog
Form last part of Blogs Tutorial you learned How to Change DNS or NameServer. In this part you will learn The 3 Easiest Steps To Create a Blog. It’s really easy and only 3 easy steps. Exited to see your first blog? Definitely you are and it’s very interesting. So, hold your excitement for few minutes and just follow my steps. You will be able to start your own blog in next 15 minutes.
What you need to create your first blog?
You need only your hosting account user id and password. You can access to CPANEL using your user id and password. Oh! I forgot to say you about CPANEL. CPANEL is a panel where you will maintain your hosting account. Means installing blog, adding domain, sub domain, email account etc. To access your CPANEL you just type as below in browser:
http://yourDomain.com/cpanel
Then it will ask user id and password. Just enter user id and password and you can access your cpanel.
Note: Depending on situation you need 48 hours to access CPANEL after you bought your hosting package.
Let’s Start With The 3 Easiest Steps to Create your Blog:
Step1: Log In to your CPANEL. You will get a screen as below:
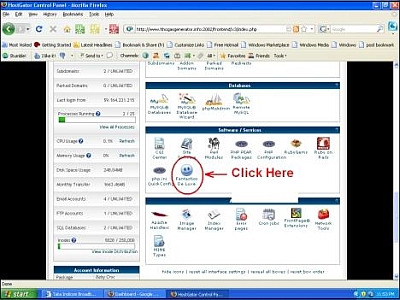
Step1.1 Click on Fantastico De Luxe as shown in image.
Step1.2 Now you will get a new window. click on Wordpress in the Navigation bar
Step1.3 Click on New Installation
Step1 is over and now proceed to Step2.
Step2. After clicking on New Installation you will get following window. I am explaining each step.
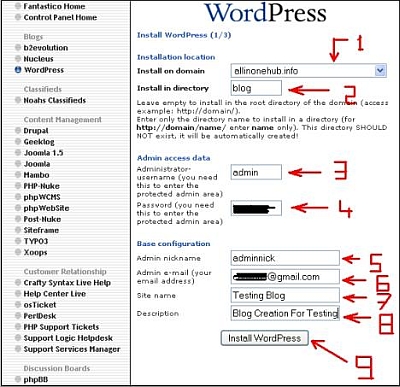
Step2.1 Select domain to install. If you have only one domain then select the domain name as YourDomainName.com
Step2.2 Here you have to decide whether you want to install your blog in root directory of your domain or in a sub directory.
Root directory means your blog will be installed in your domain root. For example: http://YourDomain.com
Sub directory means your blog will be installed in a sub directory of your domain root. For example: http://YourDomain.com/SubDirectoryName/
If you choose root directory then your blog URL will be http://YourDomainName.com and if you choose sub directory then it will be http://YourDomainName.com/SubDirectoryName/
In this example I choose sub directory as there is already a blog present in my root directory.
Step2.3 Enter Administrator User Name
Step2.4 Enter Password
(Please copy in notepad as I am going to refer it in next step)
Step2.5 Enter Admin Nick Name
Step2.6 Enter Admin Email Id (your Email Id)
Step2.7 Enter your Blog Name
Step2.8 Give a Blog Description
Step2.9 Click on Install Wordpress
This step is most important and this is the final step of your blog. Double check everything before you click on Install Wordpress. Proceed to Step3(Final Step)
Step3. Once you click on Install Wordpress you will get below window:
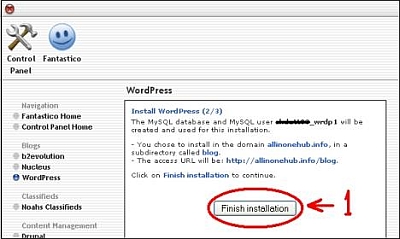
Step3.1 If everything you entered properly in Step 2, just click on Finish Installation
Well, these are the 3 easy steps to create your blog. Your blog is already created. However though you have successfully created I want to give some more details so that you can instantly start with new posting.
These are the added step that you want to perform. These steps are not repleted to creating a blog. Just follow to understand better.
Step1. Once you click on Finish Installation you will get confirmation window as below:
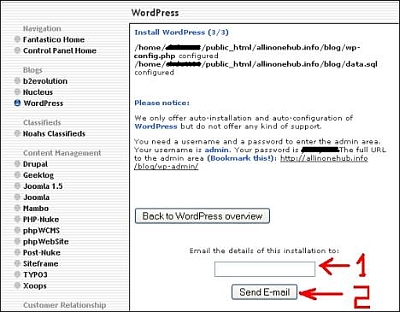
Step1.1 Enter a email id so that you can receive all details of your blog through email.
Step1.2 Click on Send Email
Everything is done. It’s time to see your blog now.
Step2. Enter your Blog URL in browser. Remember If you have chosen root directory then your blog URL will be http://YourDomainName.com and if sub directory then it will be
http://YourDomainName.com/SubDirectoryName/
Once you entered your URL you should get your blog as:
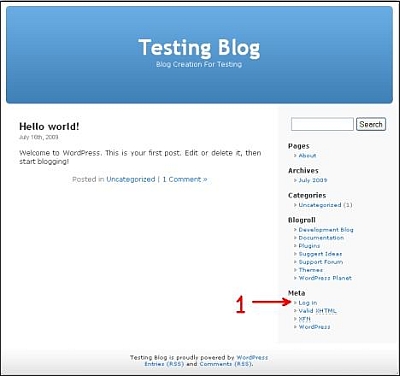
Are you feeling happy? I don’t know about you but when I saw my blog for the first time I was really so much happy. Click on Log In as indicated by number 1 and proceed to Step3.
Step3. You will get Log In window as below:
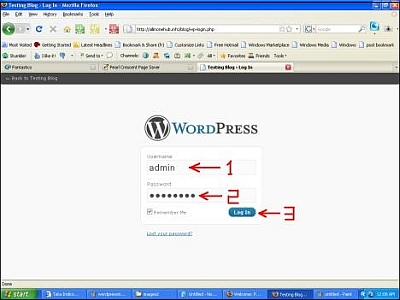
Step3.1 Enter your Administrator User Name
Step3.2 Enter your Administrator password
(I told you to copy this in notepad)
Step3.3 Click on Log In. Once you Logged In you will see your DashBoard. Let’s see how your DashBoard will look:
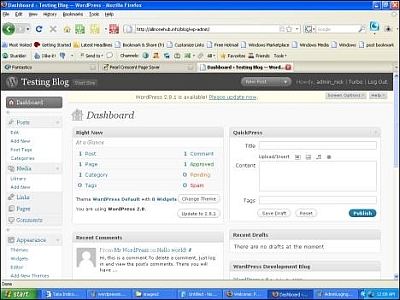
Through DashBoard you are going to manage your Blog. It is very user friendly Graphical User Interface.
I hope you enjoyed my tutorial. In next part you will learn how to create your first post and publish it. Till then stay tuned or you may subscribe for updates on this tutorial.
If you have any doubt or suggestion then put it below. I will be happy to here your feedback. Moreover if you think my tutorial is helpful for you then consider it for sharing or bookmarking.
Note: You can access to all tutorials from here -> Blogs Tutorial
Related articles by Zemanta
- How to Hotwire WordPress in 7 Steps (wardontheweb.com)
- Installing WordPress MU (themoxiemomblog.com)
- How to Start a Web Site in Six Easy Steps (poynter.org)
- 5 Steps To Practical WordPress Security (howtospoter.com)
- Installing BuddyPress (themoxiemomblog.com)
Tags:blog hosting,blogging ideas,create a blog,start a blog,wordpress blog hosting tutorial
Related posts
Internet highlights
- Best Non Gamstop Casino
- Miglior Casino Non Aams
- Migliori Siti Casino Online
- Non Gamstop Casino
- UK Online Casinos Not On Gamstop
- Non Gamstop Casino
- Siti Casino Non Aams
- Bookmaker Hors Arjel Acceptant Les Français
- Casino Sites Not On Gamstop
- Meilleur Casino En Ligne
- Non Gamstop Casino UK
- UK Casino Not On Gamstop
- Non Gamstop Casino UK
- Non Gamstop Casino UK
- Casinos Not On Gamstop
- Non Gamstop Casinos
- Migliori Siti Casino Non Aams
- Best UK Casino Sites
- Non Gamstop Casino UK
- UK Casinos Not On Gamstop
- Non Gamstop Casinos
- Best Betting Sites In UK 2025
- Casinos Not On Gamstop
- Casino Italiani Non Aams
- Casino Non Aams
- Crypto Casino
- Casino Français Crypto
- Sites De Paris Sportifs Belgique
- Sites De Paris Sportifs Belgique
- Casino Online
- Casino Non Aams
- Casino En Ligne Avec Retrait Immédiat
- Site De Paris Sportif Tennis
- ライブカジノ ルーレット
- オンカジ 出金早い
- Meilleur Casino En Ligne
- Casino En Ligne
- Casino Online
- Meilleur Site De Casino En Ligne
- Meilleur Casino En Ligne 2026
- Casino En Ligne Français
![The 3 Easiest Steps To Create a Blog Reblog this post [with Zemanta]](../../../reblog_e.png)


The 3 Easiest Steps To Create a Blog…
Want to start Blogging? Learn How To Create a Blog In Just 3 Easy Steps!…
Nice article… but dont u think creating a blog in blooger would be much easier for anewbee. I got a tutorial which says it can create a blog in 5 minutes:
http://www.justawebmaster.com/.....5-minutes/
Thanks for feedback. I prefer self hosted blog to Blogger blog. Blogger blogs are not so flexible as self hosted Wordpress blog.
Nice tutorials! I absolutely like the detailed approach of this tutorials. Most bloggers prefer self hosted WP blog. Simply, because it is much better when in terms of availability of different WP plugins that are really useful to WP users.
Thank you Paul for feedback. I like Wordpress blog most because of it’s flexibility.
This is a detailed tutorial to create a blog with Fantastico and it is very helpful. However not every hosting provider use Cpanel and Fantastico. So EarnMoneyOnlineHubber, if you have time, you can make another post about the common way to setup a self-hosted WP blog.
Funny how I have been using Cpanel for years but never installed WP like this. I create a DB, add a user to the DB, edit the config.php file and that’s it.
Very good information, thank you very much by the article and the quality of your Web site. A greeting from Chile.
This post is very well explained and I was able to understand more about blogs. Even friends tried to explain to me but this post has explained to me everything I need to know. Keep it up!
I always use FTP to upload my blogs and it takes FOREVER! This will def. help cut back on the time that it takes to create a new blog.
Excellent article, explained very clearly. Congratulations on the quality of your website. Greetings from Chile.
I usually use FTP to upload the files, I never used Fantastico feature for this, seems much easier like this. Great screenshots too
It is easy indeed. Clear explanations. All reader will able to understand and follow these steps.
Hi ,I just come across to your site while surfing. I enjoy fully reading your post and your 3 step to create a blog is very good with good explanation especially for newbies.
Best Wishes,
The Pakistan Blogger.
Awesome tutorial for all the beginners with WP. All you need to do now is start blogging and make some money to pay the rent
Patel
Great tutorial! It’s a shame that so many would-be bloggers decide not to self-host their own blog due to technophobia. Blogging is so much better when you actually OWN your domain and indeed your content rather than being at the mercy of a third=party host who can shut you down on a whim.
David
Thank you David for taking time to comment. Agree with you. Whoever is serious in online business, they should have their own hosting account.
Regards,
Chandan
Blogging?? This will be new thing that I can try. That tutorial will help me much for my online business…I will be a smart newbie in blogging with that tutorial. Thanks a lot for it…
Hi,
This is my first post, and frankly speaking. I do not yet know how to create an impressive and educational blog. When I say impressive, I mean that visiting people like it.
Regards,
rabia
wordpress is so cool ! i guess there should be more tutorials about tips and tricks related to wordpress
thanks for the detailed information here. I think anyone can start a blog. i have a month old blog at http://www.naibayblog.com at which i started from scratch and i already customized it.
Is it better to have your blog hosted on your site, or separately (with the articles linking back to the main site)? I seem to get varying opinions on this.
It depends actually. You can install Wordpress in the same hosting account. If you use another hosting account for the linking purpose, then this will definitely help your main site. But for that you will have to purchase 2 hosting account.
Unless you don’t have many sites, I don’t think you should purchase 2 hosting account. Google count backlinks based on Unique Class C IP. Even though you create 100 backlinks from your blog to main site, Google will count just one since those links are from same IP.