How To Change Your DNS or Name Servers?
In the last part of my Blogs Tutorial I told about domain name and hosting account. In this part I am going to show you the steps of changing your DNS or name server in details. I hope you are already ready with your domain name and hosting account. If not get it now, otherwise you won’t understand this part.
After buying domain and hosting account you need following two things to be done:
* Changing name servers
* Registering name servers
Don’t worry! It’s easy, just follow me.
Changing Name Servers:
Step1: you must have got one email from HostGator regarding your hosting account details.
The subject of email will be “Your HostGator Account Information”. Open that email and look for the following thing:
Your name servers:
nsxxxx.hostgator.com [xxxx- unique for you]
nsxxxx.hostgator.com [xxxx- unique for you]
Just copy this in notepad and proceed for Step 2.
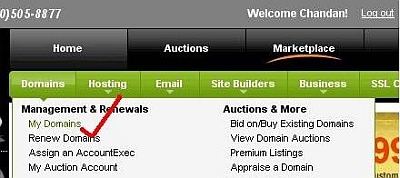
Step2. Log in into your domain account and select your domain. See the following screen:
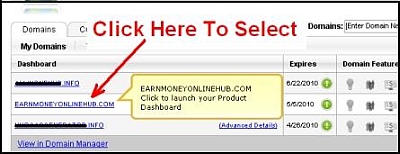
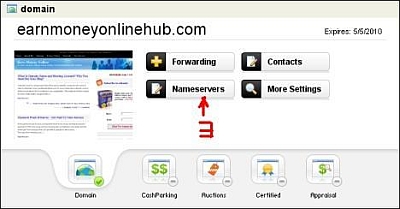
Step3. After Selecting your domain name you will get the below screen. Click on NameServers.
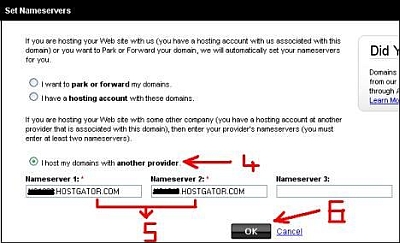
Step4. Select option I host my domain with another provider.
Step5. Fill nameserver1 and nameserver2 with the sever those you got from hostgator. Remember I asked you to copy in notepad.
Step6. click on OK.
You have successfully changed your name server. Normally change occurs within few minutes but it may take up to 48 hours. You will get once confirmation email from Godaddy. Check the email and proceed for the next step Registering Name Server.
Registering name servers:
Step1. Ask HostGator your NS1 and NS2 IP. They will provide you as:
NS1 -xxx.xxx.x.xxx NS2 - xxx.xxx.x.xxx [xxx - Your IP]
Copy these two in notepad. To know these two IP you can contact online help. Don’t worry, they are very quick in response and helpful.
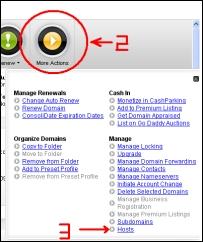
Step2. Click on More Action.
Step3. Click On Host. You will get a wide screen containing all details of your domain. Go to bottom part and Find Host summery. See Below:
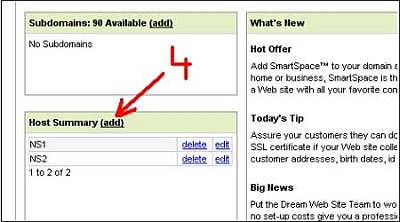
Step4. Click On Add
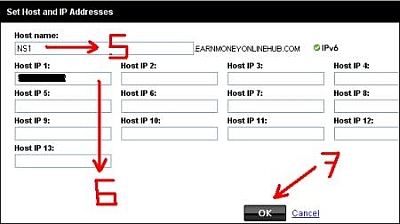
Step5. Put NS1 as shown in image.
Step6. Put your first IP means NS1 that you got from HostGator.
Step7. click on OK.
Step8. Similarly repeat 4-7 for NS2.
You have successfully Registered your Name server. You will get an email from GoDaddy regarding successful registration. Normally it takes only few minutes but it may take up to 48 hours.
Up to this you are almost ready with initial setup. Your domain name and hosting account is ready to be functional. In next tutorial I will show you how to install your blog in easy steps. Till then stay tuned or you may subscribe for updates on this tutorial.
If you have any doubt or suggestion then put it below. I will be happy to here your feedback. Moreover if you think my tutorial is helpfull for you then consider it for sharing or bookmarking.
Note: You can access to all tutorials from here -> Blogs Tutorial
Related articles by Zemanta
- GoDaddy Custom Domains and Blogger URL Forwarding/Redirect for Naked Domains (medicineandtechnology.com)
- Setting Up DKIM and DomainKeys using DKIMProxy with Postfix in Ubuntu Hardy (pocketsmith.com)
- Age of domains - Importance in search engines: (mt-soft.com.ar)
- Hostgator Disabled SSH Access Because OpenSSH Exploit (masbuchin.com)
Tags:blog hosting tutorial,blogging ideas,hosting a blog,how to change dns
Related posts
Internet highlights
- Best Non Gamstop Casino
- Miglior Casino Non Aams
- Migliori Siti Casino Online
- Non Gamstop Casino
- UK Online Casinos Not On Gamstop
- Non Gamstop Casino
- Siti Casino Non Aams
- Bookmaker Hors Arjel Acceptant Les Français
- Casino Sites Not On Gamstop
- Meilleur Casino En Ligne
- Non Gamstop Casino UK
- UK Casino Not On Gamstop
- Non Gamstop Casino UK
- Non Gamstop Casino UK
- Casinos Not On Gamstop
- Non Gamstop Casinos
- Migliori Siti Casino Non Aams
- Best UK Casino Sites
- Non Gamstop Casino UK
- UK Casinos Not On Gamstop
- Non Gamstop Casinos
- Best Betting Sites In UK 2025
- Casinos Not On Gamstop
- Casino Italiani Non Aams
- Casino Non Aams
- Crypto Casino
- Casino Français Crypto
- Sites De Paris Sportifs Belgique
- Sites De Paris Sportifs Belgique
- Casino Online
- Casino Non Aams
- Casino En Ligne Avec Retrait Immédiat
- Site De Paris Sportif Tennis
- ライブカジノ ルーレット
- オンカジ 出金早い
- Meilleur Casino En Ligne
- Casino En Ligne
- Casino Online
- Meilleur Site De Casino En Ligne
- Meilleur Casino En Ligne 2026
- Casino En Ligne Français
![How To Change Your DNS or Name Servers? Reblog this post [with Zemanta]](../../../reblog_e.png)


I found your site on technorati and read a few of your other posts. Keep up the good work. I just added your RSS feed to my Google News Reader. Looking forward to reading more from you down the road!
I loved the content of the post.
I believe that changing name servers could actually harm your site’s rank in google.That was my experience.
We need to change the Name Server if we keep our domain name and hosting account separately. There is no relation between name server and Google ranking.
Regards,
Chandan