July 20th, 2009 by Chandan Dutta
Embedding images and videos in blog post is very easy. But sometimes you may get problem because of image width and height. Because if your image width and height is more than your available content place, image may not display properly. embedding videos is much more simple. You can embed videos from YouTube or upload from your hard drive.
Steps For Embedding Images In Post:
In the editor click the Add an Image button. See the below screen:
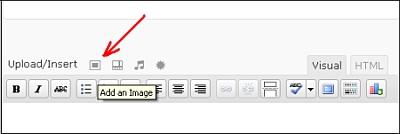
Once you click that once flash up loader will open in which you will get option to select image from your hard drive. If you have problem with flash up loader then you can try browser up loader. After selecting an image give a title for image and then click Insert Into Post.Now your image will appear in the post.
Sometimes there may some situation occur where you have to take a screen shot and want to embed that image in your post. Definitely the size of the image will be lager if you take the image by PrintScreen. So to make it fit with your blog you need a software to resize the image according to size of your content width.
You can download a free software IRFANVIEW to resize your image properly. It is very easy yo use. However you can use photoshop also. As I don’t have much knowledge in photoshop I am unable to give you tip for photoshop.
In IRFANVIEW just open your image and then go to
Image-> Resize/Resample from menu bar.
There you just set width and software will automatically adjust height. So, your image quality will be retained. Once more thing you can do for better quality of image. Go to Image-> Sharpen. It will make your image color more sharp.
You may also like to take screen shot of a full web page. In that case you can download a free FireFox AddOn. Download it here. After adding this Add-ons restart firefox. Now right click on the web page you want to save as an image and select either Save Image of Visible Portion or Save Image of Entire Page.
Steps For Embedding Videos In Post:
You may want to upload YouTube videos as well as videos from your hard drive. So I am showing you both the ways:
Embedding a YouTube Video: Get the video Embed URL. It will be in format of <object width..> Now click on HTML view of your editor and just place the URL wherever you want to display YouTube video. Remember not to go again visual mode as it can break the video. So, before embedding video to your post make other content ready to publish.
Embedding Videos From Hard drive: For this you need to install one plugin in your blog. (I will show you how to install plugin in my upcoming tutorial). You need to install All In One Video Plugin. Download it here. Install the plugin and activate it. After activated you will see a symbol in your editor. Video uploading is almost same as image uploading. It’s better if you convert your video to MP4 format because MP4 videos are compressed and it will take less time to upload. you can download free AVI to MP4 converter here.
I hope you are you enjoyed my article. If yes, then consider it for bookmarking or give me your valuable feedback below.
Note: You can access to all tutorials from here -> Blogs Tutorial
Read the rest »
July 19th, 2009 by Chandan Dutta
In my Blogs tutorial today you will learn how to create your first post and publish it. I hope you are already familiar with your new domain name and hosting account. Before telling how to create your first post let me explain you few details about your blog dashboard.
Once you logged in you will get your blog dashboard. I already shown you in last part of tutorial. Dashboard is like control panel of your blog through which you will manage your blog.
Few things you need to know initially about DashBoard:
Post: In this widget you will get option for creating a new post, edit a post, add categories and manage tags. Using categories you can combine similar blog post into a category. Tags are the keyword for post. You can display category in sidebar of blog and tags will appear below each post. So, create one category before publishing your post.
Media: You can add, manage media those you are going to use in your blog.
Links: Links are the external link those you can set here. Normally it appears under blogroll. You can add any link whatever you want.
Pages: These are static content those will appear in your menu bar. You can either add a page or edit a page.
Comments: This section will show the latest comment on your blog.
Appearance: Through the option available in this widget, you can customize your blog like changing theme, editing code, managing widget etc. Latter I will show you everything.
Plugins: Installing new plugin you can enhance your blog with new feature. You don’t need to anything at this stage as latter I am going to explain everything.
Tools: provide setting for Speedup Wordpress Blog, Comment subscription, Clipping text and images etc. As this is your first time don’t go brief for all those now. Once you become familiar with your blog, you can understand these option very easily.
Setting: Various settings for your blog.
OK, I gave introduction to main part of your Blog DashBoard. Lets’ create our first post.
Steps In Creating First Blog post:
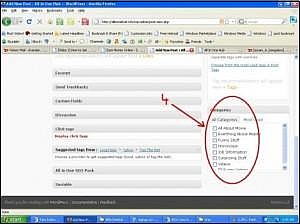
To create a post click on new post from Post Widget or click on New Post button. New Post button that display on top-center place of dashboard. Once you click you will get below window. You will get explanation for each steps below these two images:
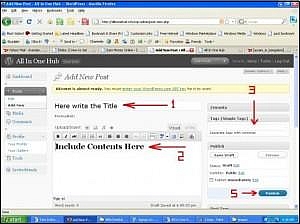
1. Enter your post Title.
2. Include your post content.
3. Use specific keywords for your blog post.
4. Select a category. If you haven’t created any category then by default you will see General as category. To create a category select Categories in Post widget. There you can add category. Either way you can create by clicking +Add New Category in Categories widget.
5. Click on publish button.
That’s all. Your blog post is live now. Now open once new browser and type your blog url. You will see your blog post appearing at top. Either way you can directly view your blog from your dashboard clicking on your blog name.
Few more tips for well formatted blog post:
By default your post text will take the format of left-aligned. There is only three alignment option available - left-aligned,center-aligned and right-aligned. There is no option for justify-aligned and I don’t like if blog posts are not well formatted.
It’s easy to do that. You have to use only one html tag. Select HTML mode of editor and add this tag to your content:
<p style=”text-align: justify;”> Your Post Content </p>
One more way to do that. You can use:
<div style=”text-align: justify;”> Your Post Content </div>
Now your post content will be properly formatted.
I hope you are able to publish your first blog post now. In next part you will learn how to add image and video in your blog post. Till then stay tuned with me or you can subscribe for new updates.
Note: You can access to all tutorials from here -> Blogs Tutorial
Read the rest »
July 16th, 2009 by Chandan Dutta
Form last part of Blogs Tutorial you learned How to Change DNS or NameServer. In this part you will learn The 3 Easiest Steps To Create a Blog. It’s really easy and only 3 easy steps. Exited to see your first blog? Definitely you are and it’s very interesting. So, hold your excitement for few minutes and just follow my steps. You will be able to start your own blog in next 15 minutes.
What you need to create your first blog?
You need only your hosting account user id and password. You can access to CPANEL using your user id and password. Oh! I forgot to say you about CPANEL. CPANEL is a panel where you will maintain your hosting account. Means installing blog, adding domain, sub domain, email account etc. To access your CPANEL you just type as below in browser:
http://yourDomain.com/cpanel
Then it will ask user id and password. Just enter user id and password and you can access your cpanel.
Note: Depending on situation you need 48 hours to access CPANEL after you bought your hosting package.
Let’s Start With The 3 Easiest Steps to Create your Blog:
Step1: Log In to your CPANEL. You will get a screen as below:
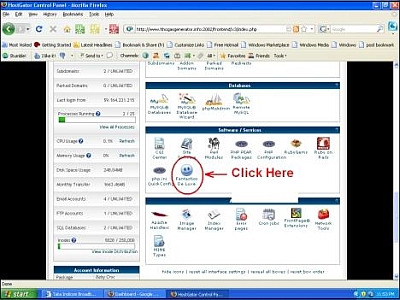
Step1.1 Click on Fantastico De Luxe as shown in image.
Step1.2 Now you will get a new window. click on Wordpress in the Navigation bar
Step1.3 Click on New Installation
Step1 is over and now proceed to Step2.
Step2. After clicking on New Installation you will get following window. I am explaining each step.
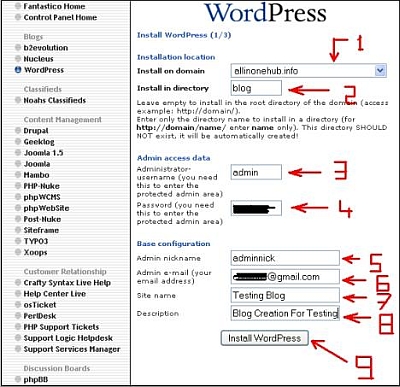
Step2.1 Select domain to install. If you have only one domain then select the domain name as YourDomainName.com
Step2.2 Here you have to decide whether you want to install your blog in root directory of your domain or in a sub directory.
Root directory means your blog will be installed in your domain root. For example: http://YourDomain.com
Sub directory means your blog will be installed in a sub directory of your domain root. For example: http://YourDomain.com/SubDirectoryName/
If you choose root directory then your blog URL will be http://YourDomainName.com and if you choose sub directory then it will be http://YourDomainName.com/SubDirectoryName/
In this example I choose sub directory as there is already a blog present in my root directory.
Step2.3 Enter Administrator User Name
Step2.4 Enter Password
(Please copy in notepad as I am going to refer it in next step)
Step2.5 Enter Admin Nick Name
Step2.6 Enter Admin Email Id (your Email Id)
Step2.7 Enter your Blog Name
Step2.8 Give a Blog Description
Step2.9 Click on Install Wordpress
This step is most important and this is the final step of your blog. Double check everything before you click on Install Wordpress. Proceed to Step3(Final Step)
Step3. Once you click on Install Wordpress you will get below window:
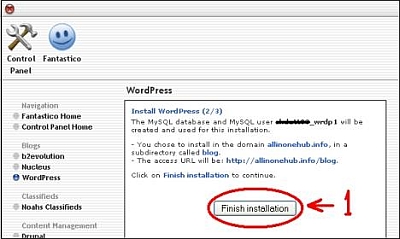
Step3.1 If everything you entered properly in Step 2, just click on Finish Installation
Well, these are the 3 easy steps to create your blog. Your blog is already created. However though you have successfully created I want to give some more details so that you can instantly start with new posting.
These are the added step that you want to perform. These steps are not repleted to creating a blog. Just follow to understand better.
Step1. Once you click on Finish Installation you will get confirmation window as below:
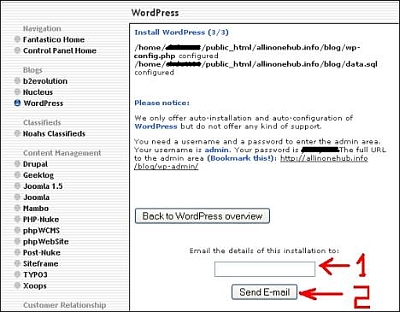
Step1.1 Enter a email id so that you can receive all details of your blog through email.
Step1.2 Click on Send Email
Everything is done. It’s time to see your blog now.
Step2. Enter your Blog URL in browser. Remember If you have chosen root directory then your blog URL will be http://YourDomainName.com and if sub directory then it will be
http://YourDomainName.com/SubDirectoryName/
Once you entered your URL you should get your blog as:
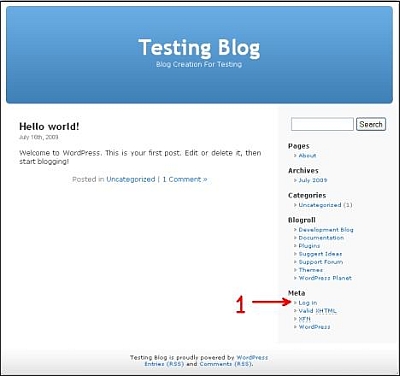
Are you feeling happy? I don’t know about you but when I saw my blog for the first time I was really so much happy. Click on Log In as indicated by number 1 and proceed to Step3.
Step3. You will get Log In window as below:
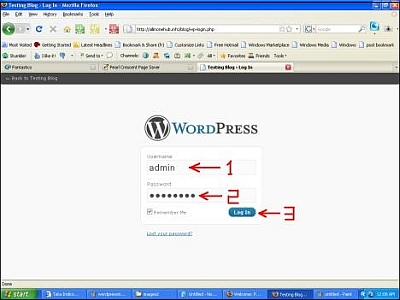
Step3.1 Enter your Administrator User Name
Step3.2 Enter your Administrator password
(I told you to copy this in notepad)
Step3.3 Click on Log In. Once you Logged In you will see your DashBoard. Let’s see how your DashBoard will look:
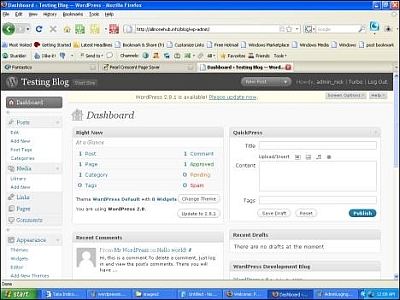
Through DashBoard you are going to manage your Blog. It is very user friendly Graphical User Interface.
I hope you enjoyed my tutorial. In next part you will learn how to create your first post and publish it. Till then stay tuned or you may subscribe for updates on this tutorial.
If you have any doubt or suggestion then put it below. I will be happy to here your feedback. Moreover if you think my tutorial is helpful for you then consider it for sharing or bookmarking.
Note: You can access to all tutorials from here -> Blogs Tutorial
Read the rest »
July 15th, 2009 by Chandan Dutta
In the last part of my Blogs Tutorial I told about domain name and hosting account. In this part I am going to show you the steps of changing your DNS or name server in details. I hope you are already ready with your domain name and hosting account. If not get it now, otherwise you won’t understand this part.
After buying domain and hosting account you need following two things to be done:
* Changing name servers
* Registering name servers
Don’t worry! It’s easy, just follow me.
Changing Name Servers:
Step1: you must have got one email from HostGator regarding your hosting account details.
The subject of email will be “Your HostGator Account Information”. Open that email and look for the following thing:
Your name servers:
nsxxxx.hostgator.com [xxxx- unique for you]
nsxxxx.hostgator.com [xxxx- unique for you]
Just copy this in notepad and proceed for Step 2.
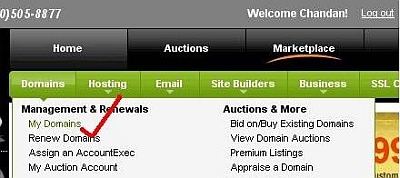
Step2. Log in into your domain account and select your domain. See the following screen:
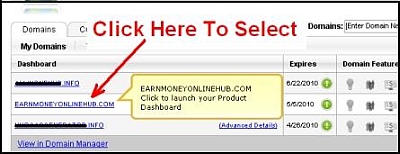
Step3. After Selecting your domain name you will get the below screen. Click on NameServers.
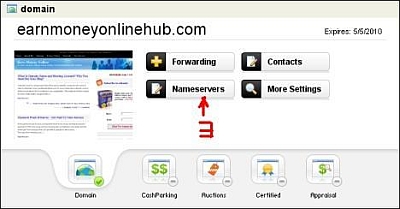
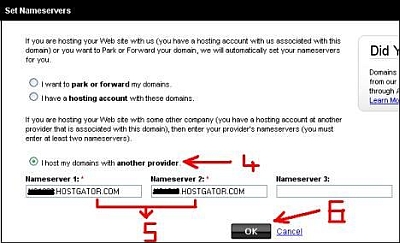
Step4. Select option I host my domain with another provider.
Step5. Fill nameserver1 and nameserver2 with the sever those you got from hostgator. Remember I asked you to copy in notepad.
Step6. click on OK.
You have successfully changed your name server. Normally change occurs within few minutes but it may take up to 48 hours. You will get once confirmation email from Godaddy. Check the email and proceed for the next step Registering Name Server.
Registering name servers:
Step1. Ask HostGator your NS1 and NS2 IP. They will provide you as:
NS1 -xxx.xxx.x.xxx NS2 - xxx.xxx.x.xxx [xxx - Your IP]
Copy these two in notepad. To know these two IP you can contact online help. Don’t worry, they are very quick in response and helpful.
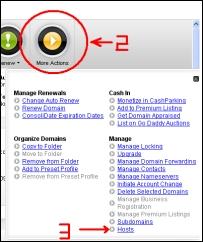
Step2. Click on More Action.
Step3. Click On Host. You will get a wide screen containing all details of your domain. Go to bottom part and Find Host summery. See Below:
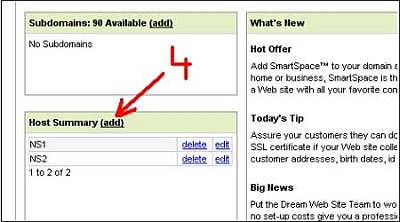
Step4. Click On Add
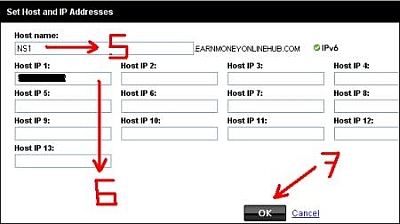
Step5. Put NS1 as shown in image.
Step6. Put your first IP means NS1 that you got from HostGator.
Step7. click on OK.
Step8. Similarly repeat 4-7 for NS2.
You have successfully Registered your Name server. You will get an email from GoDaddy regarding successful registration. Normally it takes only few minutes but it may take up to 48 hours.
Up to this you are almost ready with initial setup. Your domain name and hosting account is ready to be functional. In next tutorial I will show you how to install your blog in easy steps. Till then stay tuned or you may subscribe for updates on this tutorial.
If you have any doubt or suggestion then put it below. I will be happy to here your feedback. Moreover if you think my tutorial is helpfull for you then consider it for sharing or bookmarking.
Note: You can access to all tutorials from here -> Blogs Tutorial
Read the rest »
July 14th, 2009 by Chandan Dutta
A domain name is a unique name that will be used to identify computer in the world of web. It is like http://www.YourDomainName.com For more simple term a domain name is similar to a employee id of a employee in any organization. The employee will have unique id which will be used to recognize that particular employee, similarly domain name are also unique for each computer those are connected through Internet. My domain name is EarnMoneyOnlineHub.com
Every domain name has a suffix that indicates which top level domain (TLD) it belongs to. There are only a limited number of such domains. For example: gov, edu, org, mil, com, net, ca, me, biz, info. Mostly for commercial websites or blog com is used.
This is all about domain name. For a self hosted blog you need a domain name and a hosting account. Below I am explaining about hosting account.
Hosting account is needed to store all your blog content. Your domain name will point to all those content of your blog. Like previous example of domain name with employee, employee id is similar to your domain name. Now that employee has his own house or some place where he stays. Similarly you need a location where you can store all your blog content. Your hosting account will be the place which will contain all your blog contents.
Either you can buy domain name and hsoting account separately or together in one package. Normally one .com domain cost is $10 per year and for hosting account $4.99 per month. Once you bought domain name you don’t have to do anything with your domain name after setting some initial parameter. While blogging you need your hosting account for all operations such as uploading files, modifying blog etc.
In this blogging tutorial I am showing each example with Godaddy.com for domain and Hostgator.com for hosting account. I can help you in all the cases if you buy domain name at Godaddy.com and hosting at Hostgator.com. Because I have experience with these two services. It is your wish. You can select other services for domain name and hosting account. But don’t buy hosting package in Godaddy. Hostgator hosting service is more better than Godaddy.
From my own experience I am saying Hostgator is one of the best hosting service provider. When I started blogging I didn’t know anything about hosting, domain nameserver setting etc. I got help form their support team online and successfully I started blogging.They have different packages. If you are planning to build more than one blog then go for baby package. In this package you can host unlimited number of sites for just $9.99. Buy hosting package from my blog and use “wordpress” as offer code to get first month only for $.99.
So get ready with a domain name from Godaddy.com and hosting account from Hostgator.com. In next lesson you will learn how to set your domain name and hosting account. (You can access to all tutorials from the top menu “Tutorials”)
Stay tuned with me for Complete Blogging Tutorial
Read the rest »

![How To Embed Images and Videos In Blog Post Effectively? Reblog this post [with Zemanta]](../../reblog_e.png)


